Mobile app development is only getting easier thanks to a wide variety of tools available online—tools that have been increasingly favoring Android.
After all, Android is an easier OS for developers to work with and the barrier to entry is much lower and simpler than developing for iOS.
Anyone with a new app idea and some basic coding skills can use these tools to get their app off the ground.
So you’ve pitched your app idea and developed a product. Now what?
While you may think you’re finished, the work doesn’t stop there.
Many apps released are full of bugs and other common issues that are often easy to fix.
Even if your app is free to download, your company could lose credibility quickly and receive poor reviews from a buggy app, so prepare yourself.
In this article, we’ll review what you need to know about Android Studio Debug and how it can help you launch a successful, bug-free app.
Table of Contents

Created and released by Google, Android Studio is a powerful program for Android mobile app developers that comes packed with helpful developing tools, one being their debugger.
This is a great tool for building apps because it allows developers to more easily debug their code.
You can select a device you want to debug your app on, set various breakpoints in your Kotlin, Java, and C/C++ code, and review variable and expressions at runtime.
These features and more help developers analyze their code for bugs in realtime, which of course can save time on development.
You can visit Android Studio’s debugging docs for full instructions on how to use the debugger along with some basic debugger features and operations.

Setting up the debugger is fairly simple and doesn’t have a steep learning curve. Android Studio Debug only requires a few steps, allowing for quick and easy testing of your application.
Using the debug tool, you have a few different options on how these bugs are found and where they are found in your code. But we’ll get into those options later.
PRO TIP:
Android Debug Bridge (ADB) is a command-line tool you can use to communicate with an emulator instance or a connected Android device.
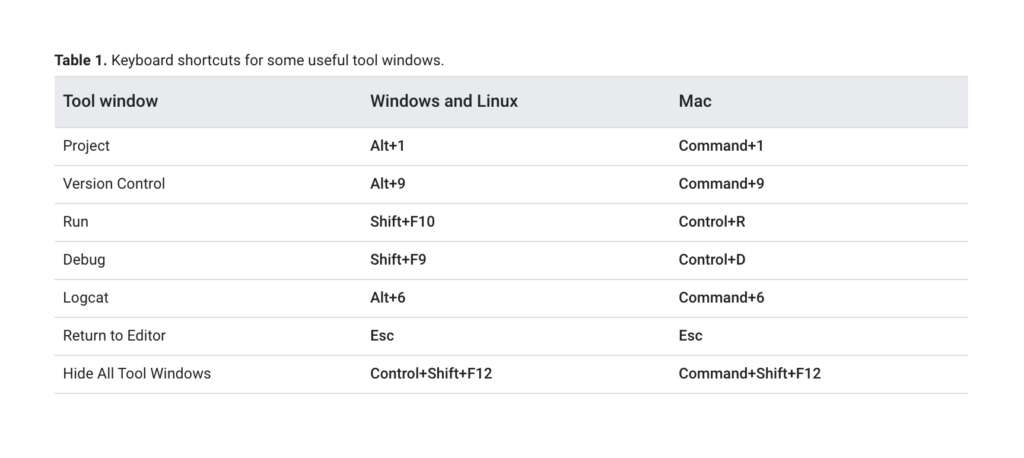
1.1 How to Set up Debugging
While this guide offers a more in-depth explanation, here is a quick review on how to set up debugging in Android Studio.

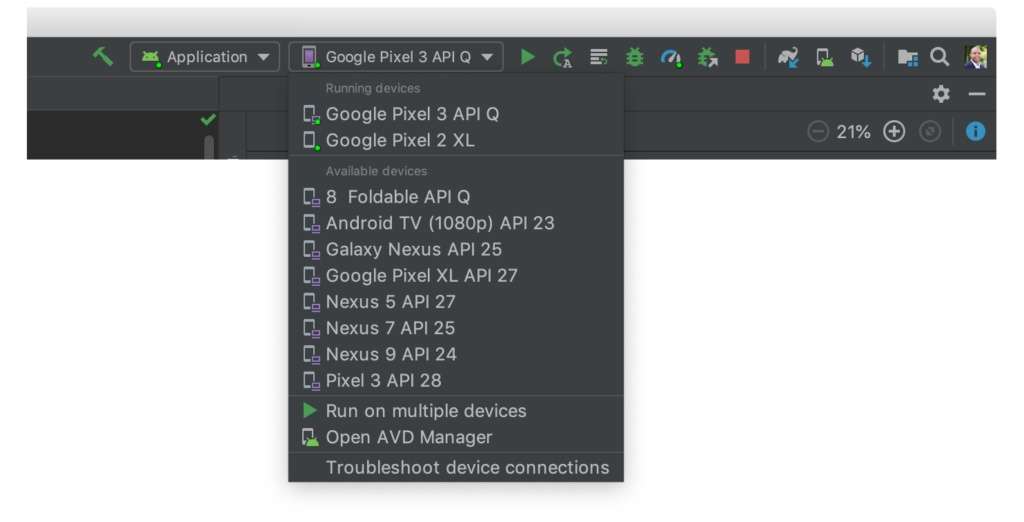
Step 1: Select your device
If you don’t have an Android device handy, that’s OK! It’s pretty easy to set up Android emulation on nearly every desktop environment.
Android Studio’s emulator, or AVD, comes with Android Studio by default.
This is a great option for more experienced developers, but newcomers may find that it’s a little too complex to get working.
The Android Studio Debug User Interface

You can also use one of the virtualization options out there like VirtualBox, VMWare Workstation, or Hyper-V if you’re running Windows.
If you do have an Android device handy, you can install your APK and simply enable the developer options in your device settings.
Select a Device and Start Debugging Your App
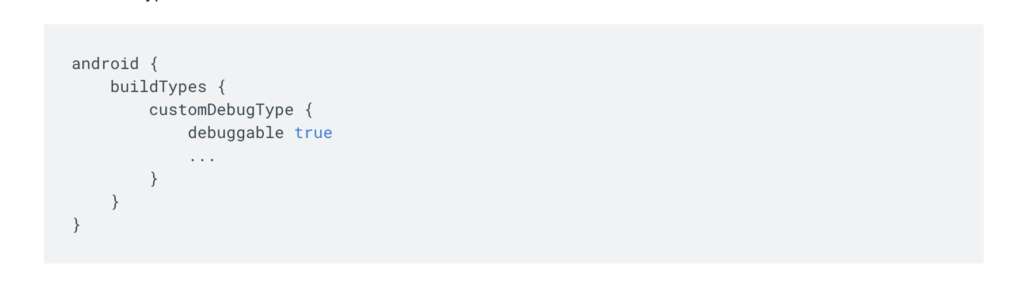
Step 2: Create a Debug Build Variant
In order to debug your application, you need to set it up as a debug build.
This is just a line of code you need to add to your application’s source code that states “debuggable true”.
Once you’ve created a debuggable build variant, you can start debugging your application.
Step 3: Breakpoints
Anyone who has some programming experience is probably familiar with breakpoints.
A breakpoint is a specified part of your code that stops the execution of your code at that point, which helps when coding and styling for multiple devices and screen sizes.
PRO TIP:
Tell the IDE to suspend when there’s an exception by hitting cmd + shift + F8 or Run > View Breakpoints to bring up the breakpoints window.
It also comes in handy when debugging an app.
Debugging the entirety of your program at once is not recommended, as it can be overwhelming.
View and Configure Breakpoints When Debugging
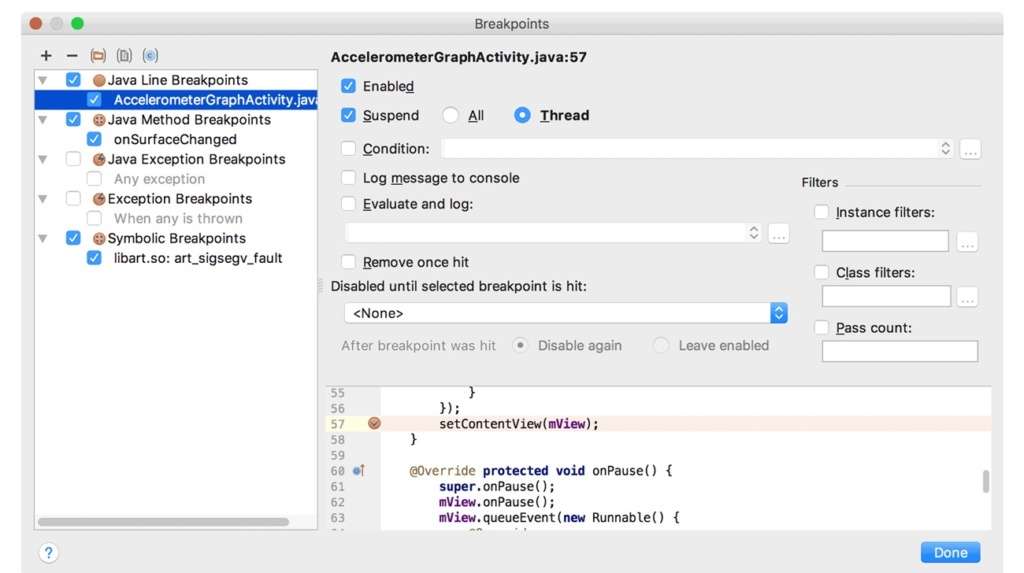
Adding breakpoints helps you work on specific portions of code at a time, letting you focus on specific bugs easier.
Android Studio gives a more in-depth guide to breakpoints, which can be helpful for newcomers.
Step 4: Using the Log
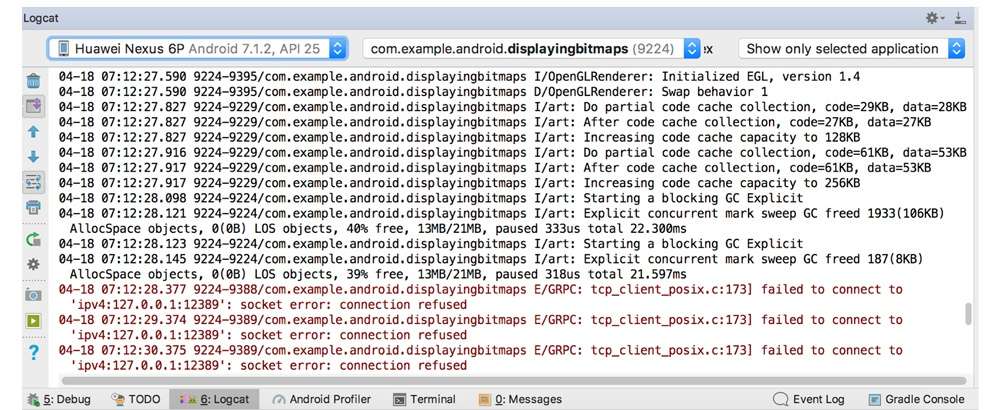
When debugging, the system logs are your best friend.
Logs, or messages in your code, offer an insight into how the machine is interpreting your code, or not running it as you intended.
Logcat Message Format
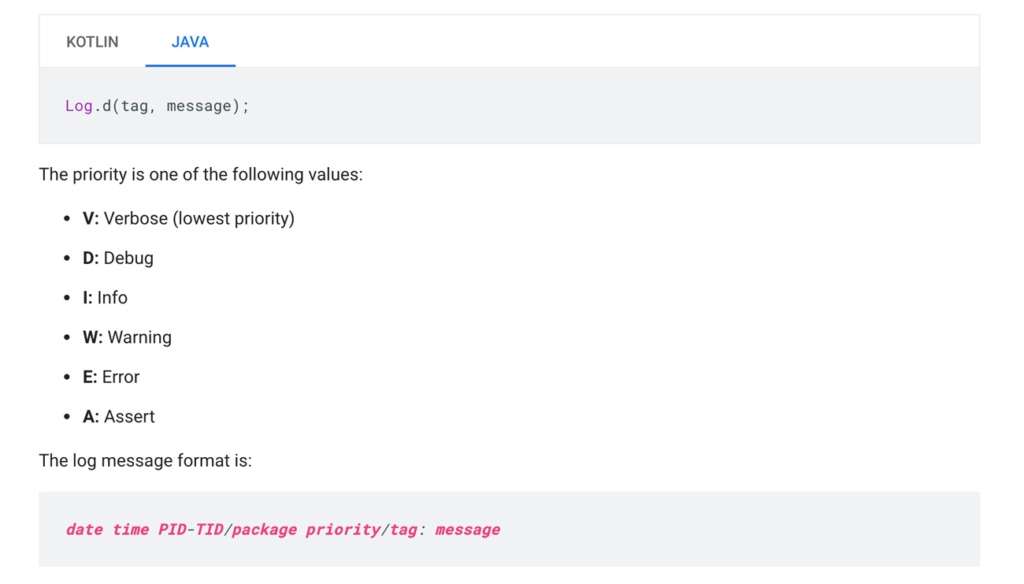
These allow you to better understand in which order things are running in or what exceptions are being caught.
PRO TIP:
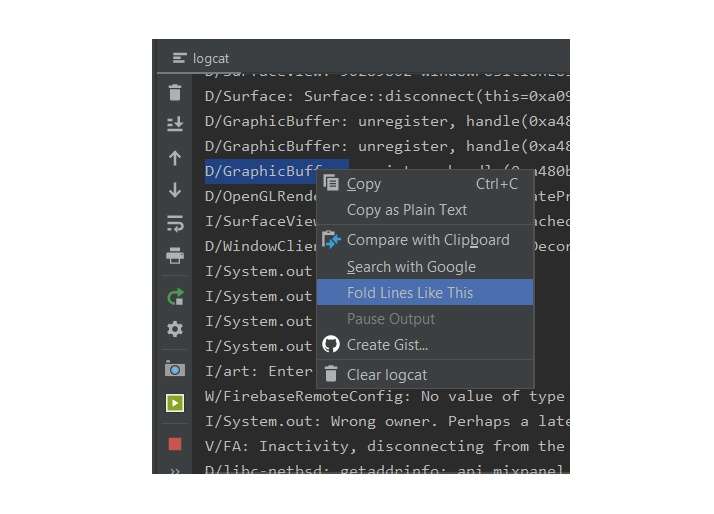
Fold your logs to collapse information you don’t need by right-clicking on the log string and selecting the Fold Lines Like This option from the dropdown.
1.2: What to Look for When Debugging
While the logs of your system are extremely helpful and can lead you in the right direction, they won’t give you the full picture.
This is where bug reports come in.
On your Android system, whether emulated or not, you have the option to download your bug reports.
View Your App Logs in the Logcat Window
On emulated systems in AVD, this is located in the “more options” area, allowing you to view and save a bug report as a zipped archive.
On Android devices, this is located in developer options and can be sent to your desktop environment.
Once you have your debug archive, it’s time to do some investigating. In the dump, you have your logs as well as a few other key pieces of information.
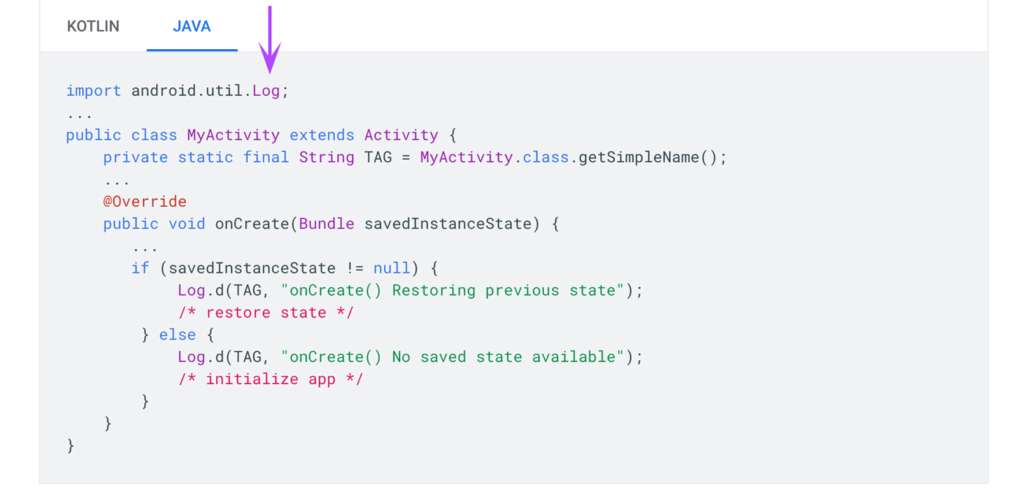
Use the Log class to Write Log Messages in Your Code
One of these important tools is Systrace. Systrace shows your application’s performance, allowing you to analyze what’s optimized well and what isn’t.
Optimization can fix bugs and help improve your user’s experience.
In your debug archive you should also reference your logs once again. Now that you have them saved, you can easily isolate events and investigate.
There are a few log tags that will guide you in the right direction.

D for debug, W for warning, and E for error will isolate possible issues for you to investigate and remedy.
This guide by Google offers a more in-depth look at log tags if you’re trying to isolate a specific, unknown issue.
Google has documentation you’ll be referencing often, so get used to it!
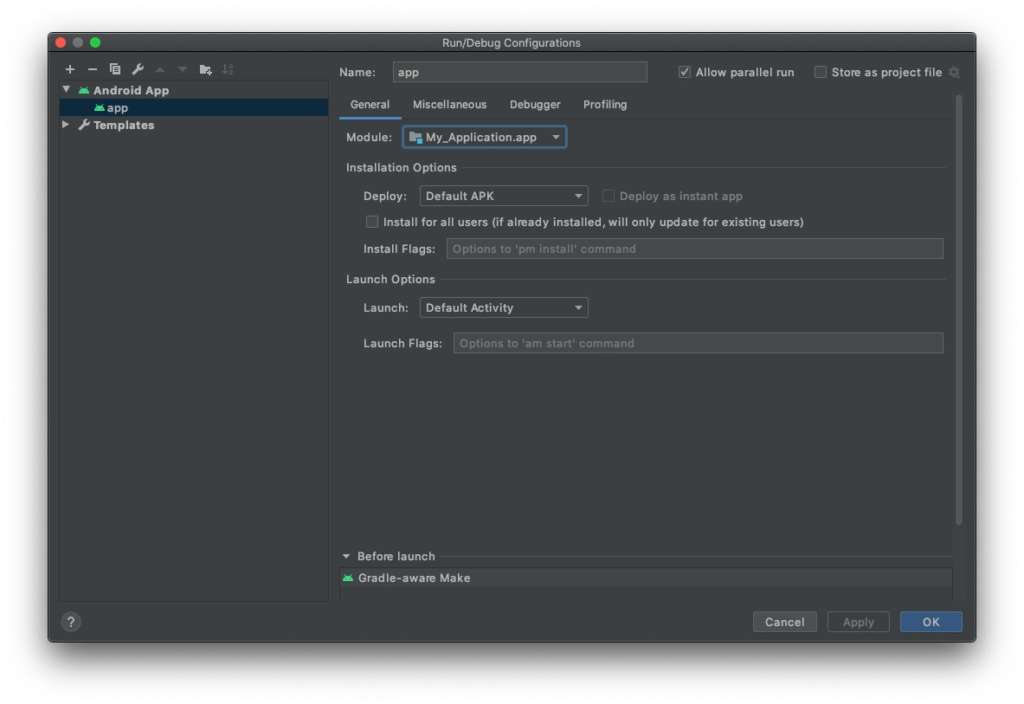
Open the Run/Debug Configurations Dialog to Update Default Templates
Android Studio Debug offers users a powerful tool to create high-quality applications, free of common issues.
There are plenty of reasons to use Android Studio Debug, and we’ve only scratched the surface.

2.1: Free and Open-Source
One of the greatest advantages to using the Android Studio debugger is that it’s open-source, meaning its completely free to use.
All you have to do is visit their website to get started in downloading the software, which takes just a few minutes.
Just keep in mind that it’s developed specifically for Google’s Android operating system, so iOS developers will have to look elsewhere for a debugging tool.

2.2: Easy to Use
Whether you’re a hardened developer or a newcomer to Android development, Android Studio Debug offers powerful tools for any skill level.
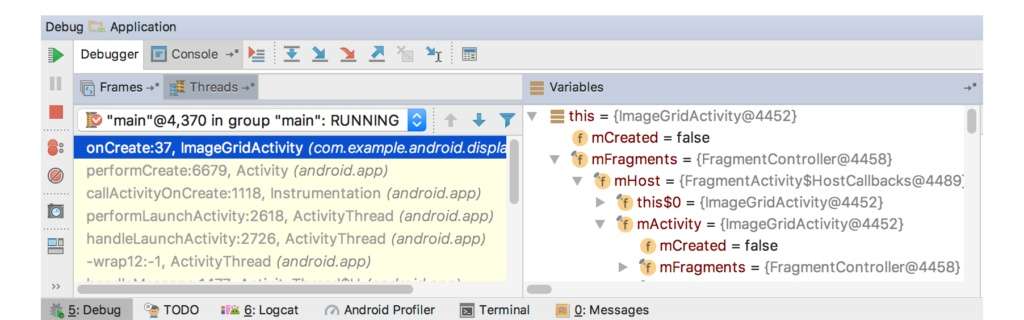
The Debugger Window, Showing the Current Thread and the Object Tree for a Variable
Their tool is fairly easy and straightforward to set up and use.
Android Studio Debug offers its developers plenty of options so debugging is possible on nearly every device or emulator.
PRO TIP:
Add watches when debugging for fields and variables you access often.
Click on the Show Watches icon and you’ll see the Watches pane appear. From there, you can click the plus sign button to type the name of the expression or variable you’d like to watch.
2.3 Built-in Emulator
While emulation has become much easier in recent years, finding a reliable emulator can still be a difficult task. Having an emulator packaged inside Android Studio is incredibly useful.
In Android Studio this is called AVD, and it allows you to easily deploy and test applications from your desktop environment.
Fold Lines to Make Debugging Easier
The best part of having the emulator built-in is that it makes bug-fixing and bug-finding even easier.
While AVD does have some known issues, which we’ll get into later, a free, built-in tool is hard to beat.
2.4: Frequent Updates
Thankfully, Android Studio releases a new update almost every other month.
These improvements can be substantial, like adding new functionality to your IDE.
Android Studio’s regular updates and feature additions help constantly improve the tool.

Android Studio and its debugging tools are powerful, and likely one of the best tools available. But that doesn’t mean it’s free of issues.
There are a few things you should be aware of before developing and debugging using Android Studio.
3.1 AVD is a Bit Sluggish
The IDE, for the most part, is pretty lightweight. On its own, you don’t need a beefy desktop to run it.
Emulation is a different story.
Many users complain that running the AVD emulator and the IDE simultaneously is sluggish and requires quite a bit more processing power and RAM.
Developer Workflow Basics

For many users, this may not be an issue. If you’re a smaller developer with limited resources, however, this could pose a problem.
If you’re limited by resources, getting an Android device to debug might be the best option.
3.2 Slow Updates
This is a small gripe, but many community members have noted that updating can take a significant amount of time.
It’s worth waiting on these updates, just prepare for it to take time.
Take a Screenshot in Logcat
3.3 Debugging Issues
Many users like to customize their tools to their liking. This offers a personalized touch to your environment and can help productivity.
One issue for debugging with Android Studio Debug involves customizing the run and debug toolbars. When moving these, they can disappear.
Accelerate Your App Development with Android Studio Code Samples
Android Studio will also sometimes force stop your debuggable build if your app is currently closed, which will be recorded in your logs.
Finally, some test run configurations may not always work as intended.
There’s a more detailed description within their documentation of debugging errors, but this is something to keep in mind.
PRO TIP:
None of these issues are major and shouldn’t prevent you from using the program. The benefits of Android Studio’s debugger tool far outweigh the downsides.
Whether you’re a new developer or someone who is experienced in Android applications, Android Studio, and its debugging tools are easily the best choice.
It’s a great learning experience for newer developers learning how to debug their app projects, but it also offers more advanced options for those who are experienced in Android applications.
If you’re building an Android app, let us help you get started with our Simple Starter package—a simple approach that includes exactly what’s needed for those starting out or those unsure what’s next in the app development journey.
Are you ready to debug your Android mobile app?